Best Fleet Dash Cam Shopping Guide
When managing a fleet of commercial vehicles, safety, efficiency, and accountability are paramount. One of the most impactful investments a fleet manager can make is equipping their vehicles with high-quality dash cams. These devices provide critical evidence in the event of accidents, help monitor driver behavior, reduce insurance costs, and improve overall operational transparency. However, selecting the right dash cam for a fleet—especially one that serves multiple vehicles across various conditions—is far more complex than simply buying a single unit for personal use. Fleet dash cams must meet strict performance, reliability, and management standards.
This comprehensive shopping guide is designed to help fleet managers, operations directors, and transportation executives navigate the vast array of options available today. We’ll walk you through the essential features to prioritize, compare different types of dash cam systems, avoid common pitfalls, and break down budget expectations. Whether you’re outfitting 10 trucks or 200 delivery vans, understanding how to choose dash cams that deliver consistent performance, easy integration, and long-term value will save time, money, and headaches down the road. By the end of this guide, you’ll have the knowledge to make an informed decision that enhances safety, reduces liability, and supports your fleet’s bottom line.
The market for fleet dash cams has expanded dramatically in recent years, driven by advances in video resolution, storage technology, wireless connectivity, and AI-powered analytics. From entry-level models with basic recording capabilities to enterprise-grade solutions offering real-time GPS tracking, cloud-based monitoring, and driver scoring, there’s a system for nearly every operational need. But not all dash cams are created equal—especially when deployed at scale. A device that works flawlessly in a sedan may fail under the harsh conditions of a long-haul truck. Similarly, a system that lacks centralized management software becomes a logistical nightmare for large fleets. This guide cuts through the marketing noise and delivers expert insights grounded in real-world fleet deployment scenarios.

What to Look for When Buying Dash Cams
1. Budget & Price Range
Determining your budget is the first and most crucial step when purchasing dash cams for a fleet. Unlike consumer-grade dash cams, fleet systems involve recurring costs beyond the initial hardware investment, including cloud storage fees, maintenance, and potential upgrades. Entry-level dash cams typically cost between $50 and $150 per unit, but these often lack durability, advanced features, and scalability. Mid-range models, priced from $150 to $300, offer better build quality, improved sensors, and basic fleet management tools. Premium systems, ranging from $300 to $600+, come equipped with GPS tracking, real-time alerts, and integration with telematics platforms.
For fleets larger than 50 vehicles, it’s wise to consider total cost of ownership (TCO) rather than just the upfront price. While a cheaper model might seem attractive initially, frequent failures, data loss, or inadequate support can lead to higher long-term expenses. Additionally, many reputable manufacturers offer volume discounts for bulk purchases, so don’t hesitate to negotiate pricing based on the number of units required. Always request detailed quotes that include installation, software licenses, and multi-year service plans.
2. Performance Specifications
Performance is non-negotiable when it comes to fleet dash cams. The primary function of any dash cam is to capture clear, accurate footage under diverse driving conditions—from bright daylight to pitch-black nights, heavy rain, snow, or tunnel transitions. Key performance indicators include video resolution, low-light sensitivity, frame rate, and dynamic range.
Resolution: For fleets, 1080p Full HD is the minimum acceptable standard; however, 2K or even 4K resolution is increasingly recommended for enhanced detail, especially in accident reconstruction. Higher resolution also improves license plate recognition and facial identification.
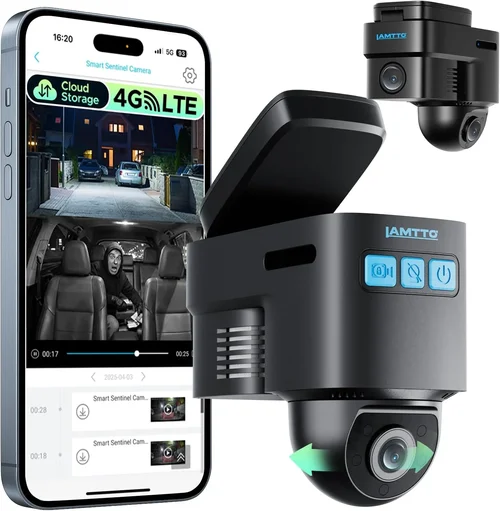
Low-Light Performance: Many dash cams struggle with night vision due to insufficient light sensitivity and poor infrared (IR) illumination. Look for models with wide aperture lenses (f/1.6 or lower), Sony STARVIS sensors, or built-in night vision LEDs. Some advanced systems use dual cameras—one for front view and another for cabin monitoring—to ensure visibility inside the vehicle during nighttime operations.
Frame Rate & Dynamic Range: A frame rate of at least 30 fps ensures smooth motion capture without motion blur. HDR (High Dynamic Range) technology helps balance exposure between bright headlights and dark shadows, reducing washed-out or overly dark footage.
3. Build Quality & Durability
Commercial vehicles operate in demanding environments—extreme temperatures, vibrations, dust, moisture, and constant movement. Consumer-grade dash cams, designed for sedans and compact cars, rarely withstand such rigors. Fleet dash cams must be ruggedized to meet industrial standards.
Look for devices rated for operation in temperatures ranging from -20°C to 70°C (-4°F to 158°F). Shock-resistant casings, IP67 or higher ingress protection ratings against water and dust, and vibration dampening mounts are essential features. Internal components should be secured with anti-vibration gaskets and shock-absorbing materials. Some manufacturers use military-grade enclosures (MIL-STD-810G compliant) specifically engineered for heavy-duty applications like construction trucks, buses, or refrigerated trailers.
Additionally, consider the mounting mechanism. Adhesive-backed mounts may loosen over time due to heat expansion or road debris. Magnetic or screw-mounted brackets offer greater stability but require professional installation. Ensure compatibility with your vehicle’s dashboard curvature and sun visor placement to avoid obstructing the driver’s view.
4. Features & Functionality
Modern fleet dash cams go far beyond simple loop recording. Advanced functionality enables proactive risk management, compliance reporting, and driver coaching. Here are the most valuable features to prioritize:
- GPS Tracking & Speed Monitoring: Integrated GPS modules log location, speed, and route history. This data is invaluable for verifying claims, optimizing routes, and identifying speeding incidents.
- G-Sensor & Event Recording: Built-in accelerometers detect sudden impacts, hard braking, sharp turns, or rollovers. Upon detecting an event, the camera locks the footage to prevent accidental deletion, ensuring critical evidence is preserved.
- Parking Mode with Motion Detection: When parked, dash cams enter low-power standby mode. If motion or impact is detected, they automatically record and upload footage to the cloud—protecting against hit-and-runs or vandalism.
- Driver Behavior Monitoring: Cabin-facing cameras track distracted driving, drowsiness, cell phone use, or unauthorized passengers. AI algorithms analyze behaviors and generate alerts or reports for supervisors.
- Cloud Connectivity & Remote Access: Real-time streaming allows managers to view live footage from any location via mobile apps or web portals. Cloud storage eliminates reliance on physical SD cards and simplifies data retrieval.
- Two-Way Audio: Enables communication between drivers and dispatchers without interrupting radio traffic. Useful for emergency situations or instructions while en route.
- Automatic Firmware Updates: Ensures all units stay current with security patches and feature enhancements without manual intervention—critical for large-scale deployments.
5. Brand Reputation
Not all brands are created equal. Established companies with decades of experience in automotive electronics tend to offer superior reliability, customer support, and innovation. Research manufacturer backgrounds, read independent lab tests, and check third-party certifications like ISO 9001 or FCC compliance.
Leading names in the fleet dash cam space include Garmin, BlackVue, Thinkware, Viofo, and Nextbase. These brands invest heavily in R&D, maintain dedicated support teams, and provide regular firmware updates. Smaller or lesser-known brands may cut corners on materials or omit essential safety features, leading to premature failure or legal vulnerabilities.
Also, verify whether the brand offers dedicated fleet management software. Generic apps may lack scalability, user permissions, or integration with existing fleet systems like ELD (Electronic Logging Device) platforms or ERP software.
6. Warranty & Support
A strong warranty reflects confidence in product quality. Most reliable dash cam manufacturers offer at least a two-year warranty covering defects and hardware malfunctions. Some extend coverage to three or five years, particularly for commercial use.
Support responsiveness is equally important. During a crisis—such as an accident requiring immediate footage access—delayed technical assistance can compound stress and delay investigations. Prioritize vendors with 24/7 customer service, multilingual support, and local service centers if operating internationally.
Ask about repair timelines: Can broken units be replaced within 48 hours? Is loaner equipment available during repairs? What documentation and training do they provide for your team?
7. Size & Portability
While size isn’t always a concern for fixed-installation dash cams, compact designs offer advantages in crowded cockpits or when retrofitting older vehicles. Ultra-slim models reduce glare and distraction while maintaining wide field-of-view angles.
However, smaller form factors sometimes compromise cooling, battery life, or internal component capacity. Avoid excessively tiny devices that lack sufficient space for robust processors or large memory buffers—this can result in dropped frames or failed recordings during critical moments.
Consider dual-camera systems where the cabin-facing unit is slightly larger but still unobtrusive. Modular designs allow swapping components without replacing entire units, reducing downtime and costs.
8. User Reviews & Ratings
Online reviews offer real-world insights beyond manufacturer claims. Pay attention to recurring complaints about poor night vision, short battery life, software glitches, or unreliable cloud sync. Positive feedback about ease of installation, durability, and responsive support is equally telling.
Beware of fake reviews or overly polished testimonials. Focus on verified purchasers who mention specific use cases relevant to your fleet—e.g., “Used this in my delivery trucks for 18 months with no issues” or “Night footage is crystal clear even on poorly lit highways.”